Baking Blogs
BAKING blogs
1st, 2nd, 3rd Rising?
In nearly all the baking videos I've watched that uses yeast, no one talks about 1st, 2nd or 3rd rising. I'm old school and sticking to my old ways of baking through several risings with the appropriate ingredients added accordingly - 1st rising (sponge: milk, flour, sugar and yeast. This small portion will tell me if my yeast is still good. If not, then I don't have to throw away the whole batch) to 2nd rising (adding everything else except the filling) to 3rd rising (adding the fillings) - a departure from how others do it.
 This method was taught to me by Philip Heyer (aka Aklay), a Michelin-rated French chef who used to be the pastry chef to the Sultan of Brunei. But Philip taught me this for baking regular bread. I don't know if it still applies to pastry or cake. But doing it this way has always come out right for me, so I'm sticking to it.
 Sep 9, 2021
Making German Stollen Bread
Location ![]() : Nawa Saraan Kitchen, Chiang Mai, Thailand
: Nawa Saraan Kitchen, Chiang Mai, Thailand
Recipe Sources:
Babish Culinary Universe by Babish
The Daring Gourmet by Kimberly Killebrew
Memories of Danang, Vietnam
When I was in Danang, Vietnam in 2018, I came upon M.Z. German Delicatessen, a German deli owned and operated by Michael Zangl, an amiable Master Craftsman in Germany. The deli sells traditional German Christmas bread - Stollen Bread, other European breads and deli cut meats. The Stollen bread was love at first bite. The taste resembled a fruit cake, but this one was sweeter and breadier. It also had that X-factor I couldn't put my finger on. I left Danang since, but Stollen Bread never left me.
Unattainable?
Frustrated over its scarcity (only German bakeries sell them and only during Christmas) and price (Stollen is always pricey for good reason), it was tempting to just walk away and remove it from memory. But every now and then, I would be taunted by anything that even remotely reminds me of it - like doing the Kipferl German cookies. I now live in a hotel with a fully functioning bakery. What's stopping me from making my own Stollen Bread? It'll be "my precious".
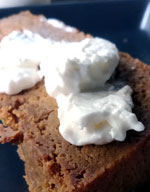
suffered long and hard for this Stollen Bread....my precious!
Ingredients
When I first saw the long list of ingredients, some of them to be homemade, it was daunting. I was overwhelmed. If there was Stollen bread to be bought elsewhere, I would have just bought one. Since I could prepare some components ahead of time, I staggered my preparation accordingly - I didn't rush it. First, I worked on making the candied citrus peels. Then I soaked it on rum together with raisins and almond slivers. Next, I prepared the dough - sans Marzipan. Doing the Marzipan recipe took much longer since I had to get a blender replacement - it delayed the project by weeks. Staggering it made it fun instead of overpowering. I salivated in eager anticipation of the first bite.
MAKE THE FOLLOWING RECIPES AHEAD OF TIME
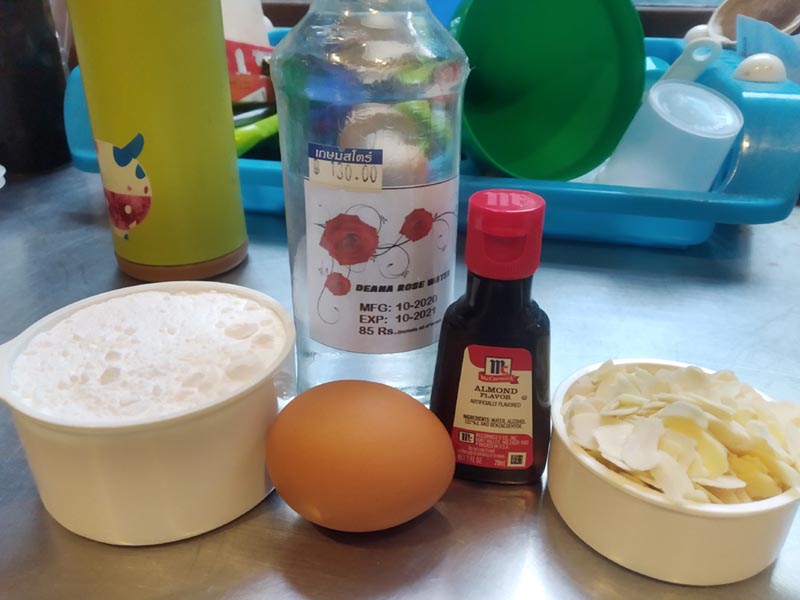
Marzipan Recipe
Ingredients:
- 1 1/2 cups very finely ground blanched almond
- 1 1/2 cups powdered sugar
- 2 teaspoons almond extract
- 1 teaspoon food grade rose water
- 1 egg white
Preparation:
- Place the almond flour and powdered sugar in a food processor and pulse until combined and any lumps are broken up. Add the almond extract and rose water and pulse to combine. Add the egg white and process until a thick dough is formed. If the mass is still too wet and sticky, add more powdered sugar and ground almonds. Keep in mind that it will become firmer after it's been refrigerated.
- Turn the almond marzipan out onto a work surface and knead it a few times. Form it into a log, wrap it up in plastic wrap and refrigerate.
- Will keep for at least a month in the refrigerator or up to 6 months in the freezer. Bring to room temperature before using in any recipe.
- Makes 1 3/4 cups of marzipan or almond paste
Candied Citrus Peel Recipe
(should yield 2/3 cups candied citrus peel. You could also just buy this in a bakery supply shop)Ingredients:
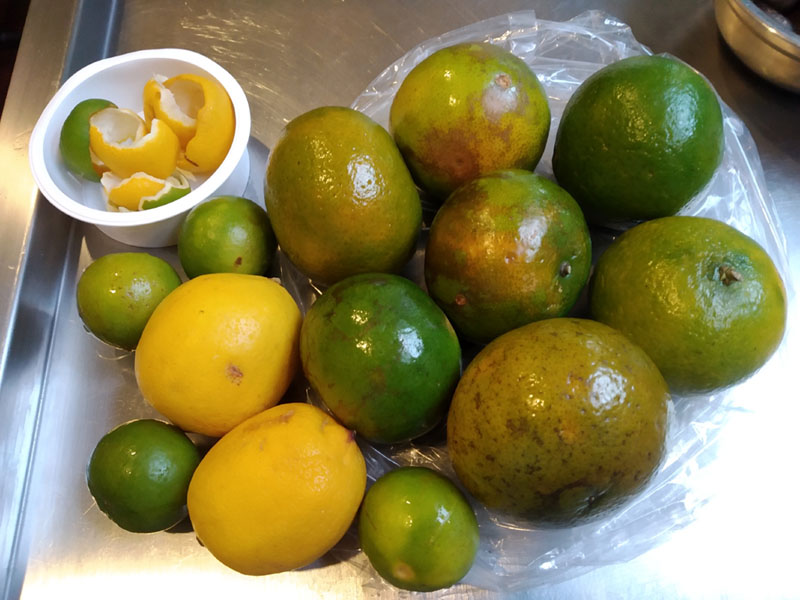
- 3 oranges and 4 lemons (or anything citrusy - grapefruit, calamansi, lime), soaked in baking soda solution
- 2 cups brown sugar
- 1 cup water
- brown sugar for coating
Preparation:
- peeling - peel the fruits being careful not to include the fruit flesh and the bitter white pith. A thin layer of pith is ok as no pith makes the peel leathery and tough. Cut into slivers or Julien.
- removing the bitterness - Boil the peels in a pot of water for 15 minutes. Drain and rinse. Boil, drain and rinse again until the bitterness is gone.
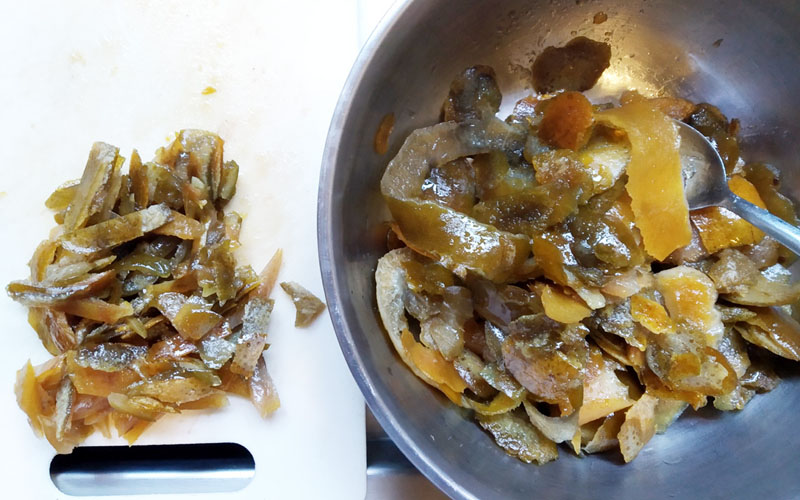
- candy-ing - stir and melt the sugar in the water and boil. Add the citrus peels and simmer, stirring occasionally, until the peels become translucent and the liquid sugar becomes syrupy - could be an hour.
- sugar coating - strain to remove excess sugar syrup (that is a very flavorful syrup you can use for coffee or cocoa drinks). Put the peels in a tupperware of brown sugar and shake to coat.
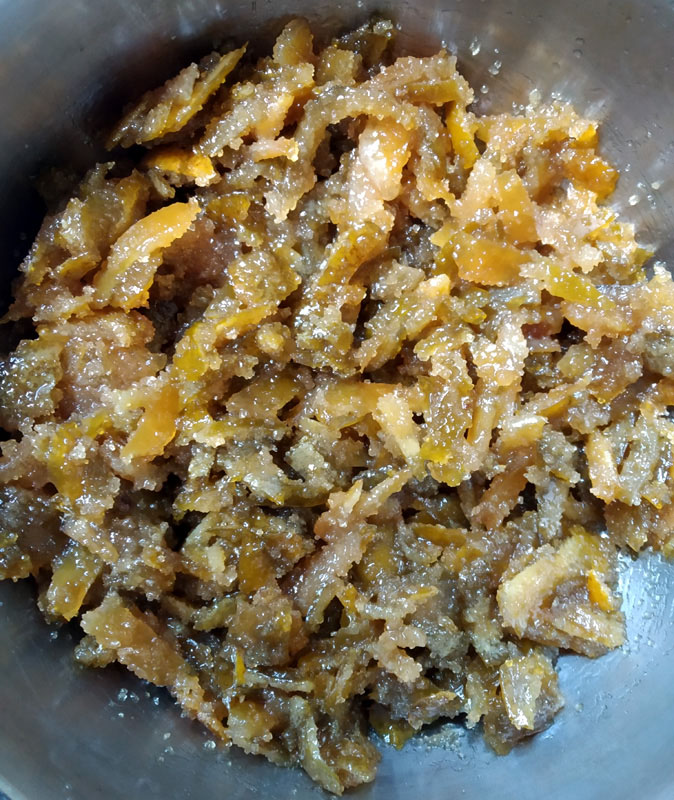
- drying - instead of dry racking, I simply spread the peels on a wide container to cool. When cooled down, I put it in the fridge to dehydrate overnight or even 24 hours.
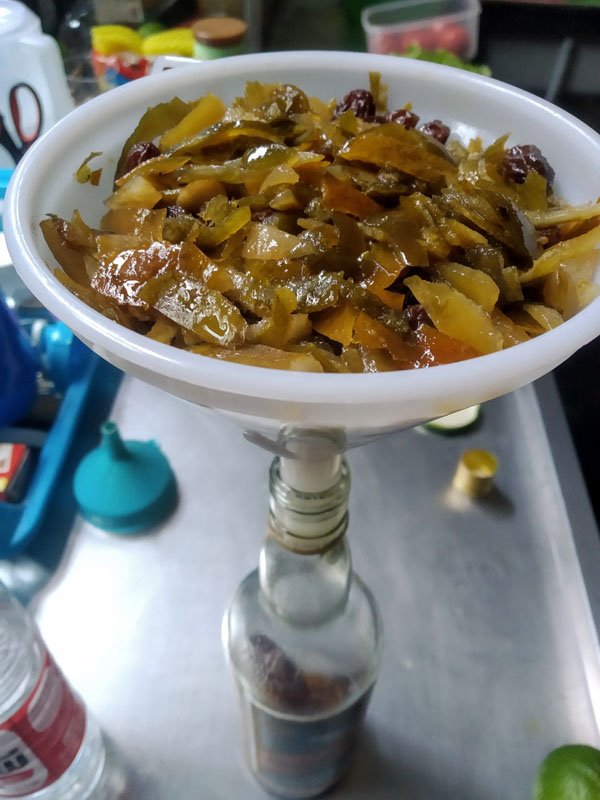
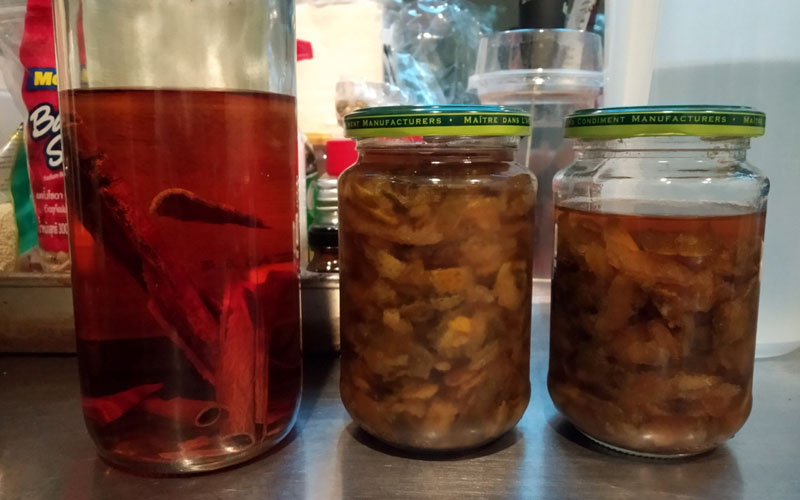
- rum soaking - When dehydrated, I simply add it to the raisin/almond/rum mixture to soak in rum as well. Add rum to make sure they remain below the surface.
- Note: Since they are soaked in rum, they will contain a lot of liquid. Strain them overnight before mixing them to the dough. There should be as little liquid as possible. Excess liquid on the dough will alter the moisture/solid ratio.
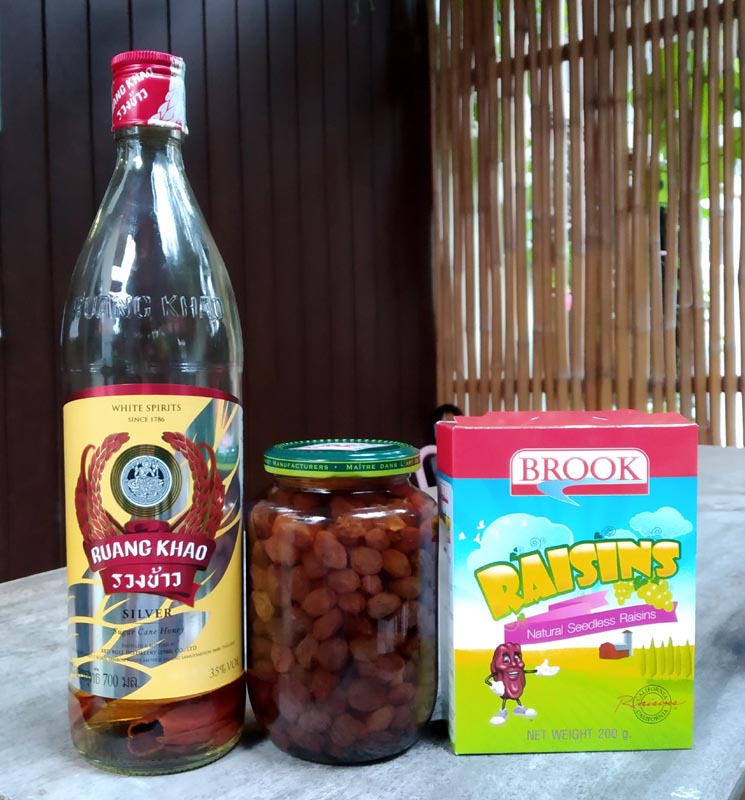
Raisin & Almond Mixture
Ingredients:
- 1 cup raisins
- 1/3 cup blanched slivered or sliced almonds , finely chopped
- enough rum to cover raisins and almonds
Preparation:
- soak raisins and almonds in the rum for a few days to fully absorb
- add the candied citrus peel to the raisin-almond-rum mixture. Make sure there is enough rum to cover mixture. You can let it sit for a few days to absorb
- Note: Since they are soaked in rum, they will contain a lot of liquid. Strain them overnight before mixing them to the dough. There should be as little liquid as possible. Excess liquid on the dough will alter the moisture/solid ratio.
Dough Ingredients:
(for ease and consistency, I've converted the ounces to cups)
- 1 cup lukewarm coconut milk or cream (or whole milk)
- 1/3 cup of the excess (thick) sugar mixture from the candied citrus peel (or 1/2 cup granulated sugar if the citrus peel is store-bought)
- 4 cups all-purpose flour
- 3 teaspoons active dry yeast -- above are mixed together (1st rising) --
- 1 large egg
- 2 large egg yolks
- 3/4 cup unsalted butter (1 1/2 sticks), at room temperature so it's very soft
- 2 teaspoons quality pure vanilla extract
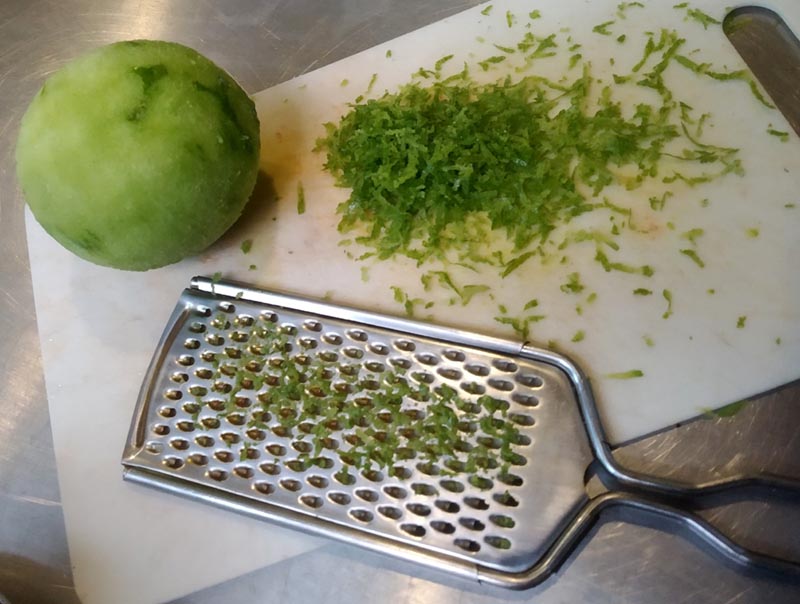
- zest of one lemon
- 1 teaspoon salt
- 3/4 teaspoon ground cardamom
- 3/4 teaspoon ground nutmeg (or mace)
- 1/2 teaspoon ground cinnamon
- 2/3 cups rum-soaked candied citrus peel
- 1 cup rum-soaked raisins
- 1/3 cup rum-soaked sliced almonds -- above are mixed together (2nd rising) --
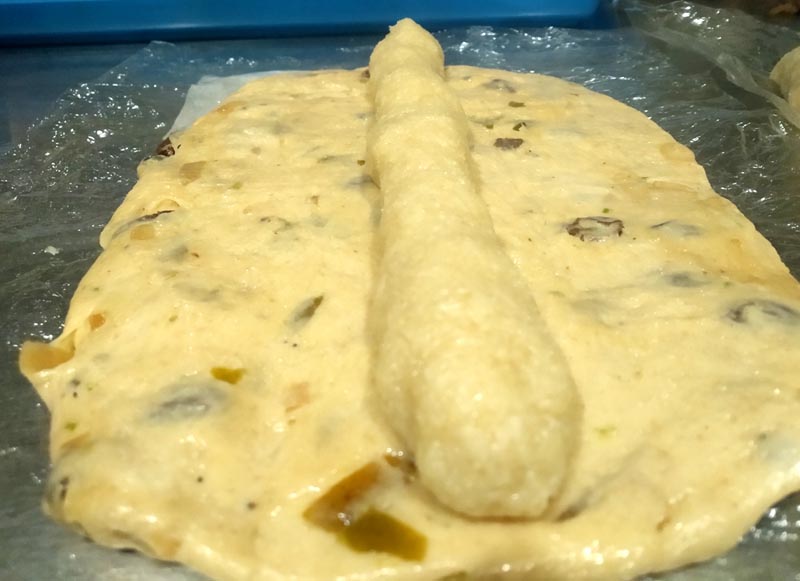
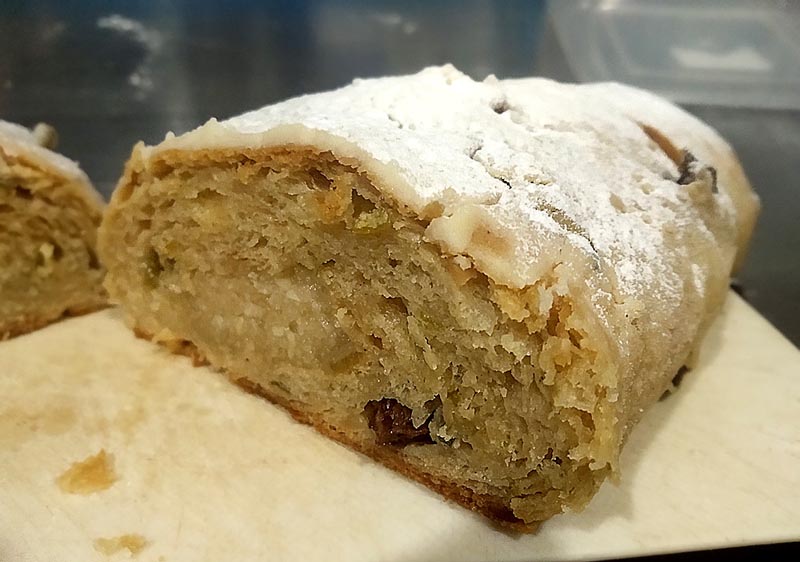
- 1 cup Marzipan [filling] (almond paste), divided in half (optional) -- the dough is rolled onto the marzipan (3rd rising) --
Glaze & Dusting Ingredients:
- 1 stick butter, melted (I used salted)
- powdered sugar for generous dusting
Preparation:
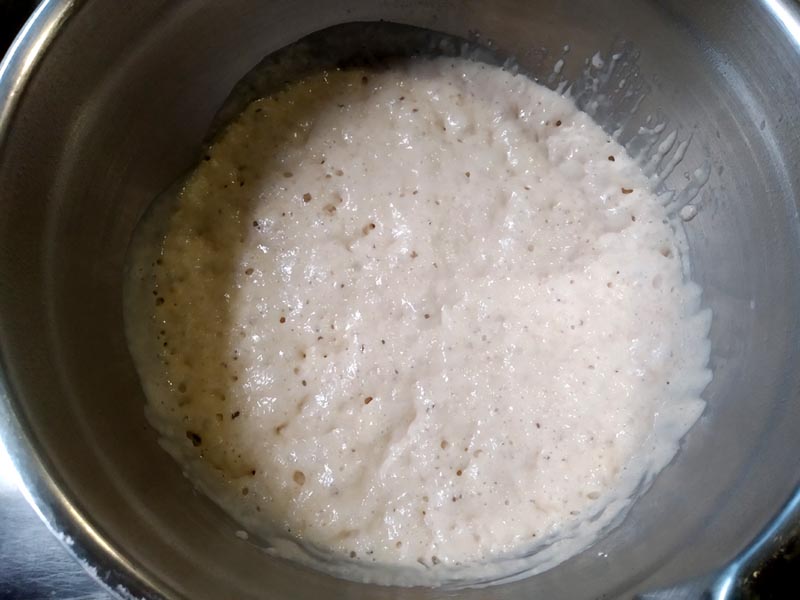
- First Rising (creating the sponge/poolish) - on a warm bowl, place 1 cup lukewarm coconut cream/milk, sugar, 1 cup flour and yeast. Whisk to create a thick soupy mixture. Cover for one hour until the mixture gets frothy with bubbles. You now have the sponge/poolish.
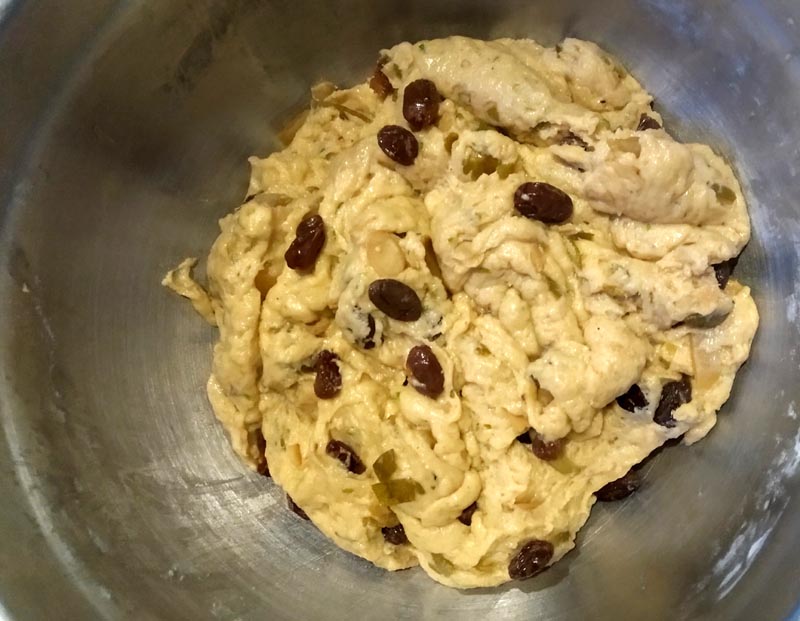
- Second Rising (adding all the ingredients except the filling [marzipan]) - add the following to the coconut milk mixture: remaining 3 cups of flour, 1 egg, 2 egg yolks, softened butter, lemon zest, salt, vanilla extract, cardamom, cinnamon and nutmeg. Last, add the rum-soaked raisin/almond/citrus peel mixture to the batter (do not add excess rum....drink it instead. Adding the excess rum will upset the liquid to flour ratio). Start kneading either by hand or stand mixer (with a dough hook). Stop when it becomes a soft dough ball (but not sticky). Leave it on the bowl, ladle a tablespoon of oil on top of the dough ball and cover for an hour - it should double in size.
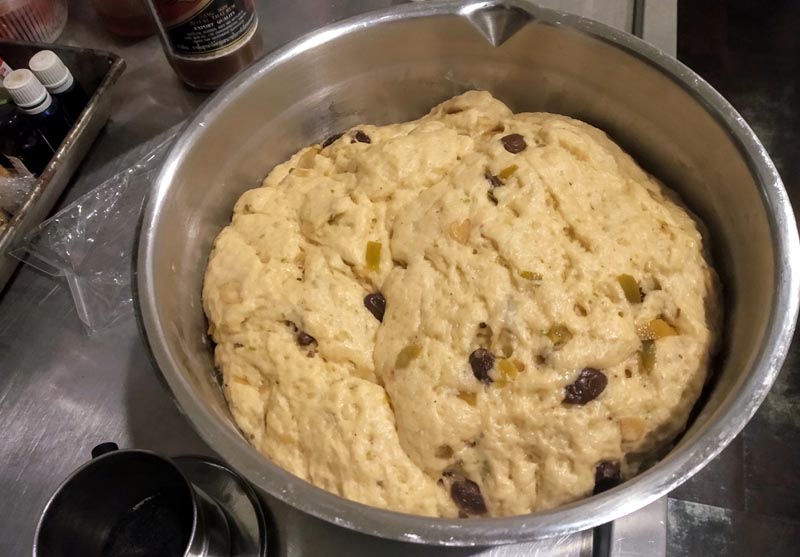
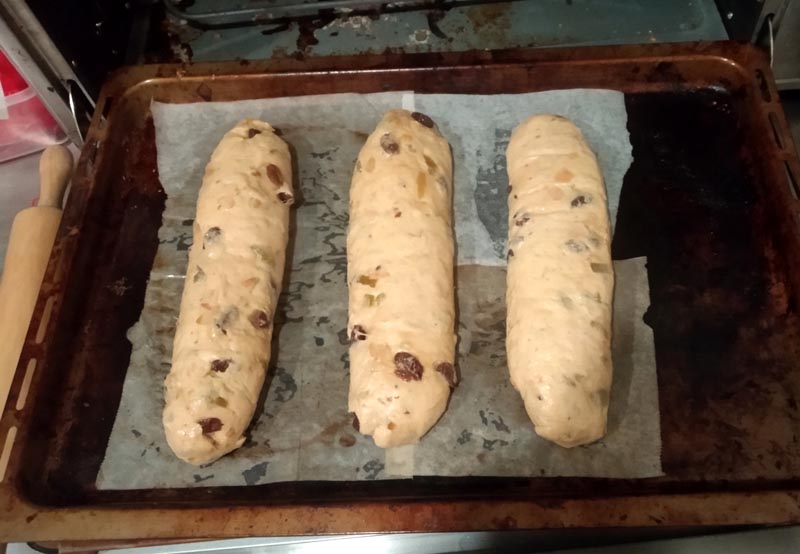
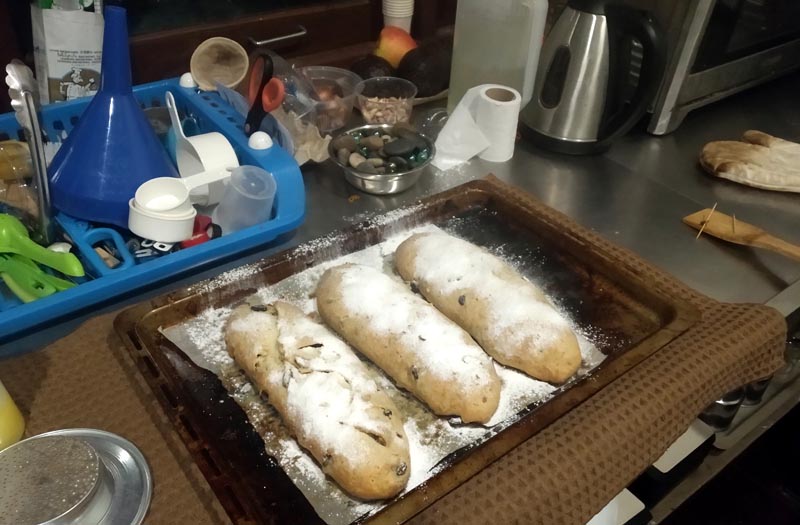
- Third Rising (scaling/dividing, adding the filling [marzipan] and shaping) - Punch down the dough to remove the air. Place the dough on a floured working area and divide in 4 pieces (or 2 equal halves - up to you) . Shape the dough into an elongated oval shape and press down until flat, about 1/2 inch thick. Roll the 4 marzipan the same length of the oval dough and place on the middle of the dough, slightly pressing down. With the dough facing you horizontally, fold the upper half of the dough to cover the marzipan - the lip of the upper half should be placed halfway between the marzipan and the lip of the lower half (or just watch the video...it's a little complicated to explain). Do the same thing to the lower half of the dough. The marzipan should be fully covered by now - but should not be in a 'straight jacket'. Press the ends of the dough to cover the ends of the marzipan. Slightly press down on the dough but not where the marzipan is. This way, the hump created by the marzipan is seen. Place the 4 doughs on the baking sheet where they will be baked. Optionally, you can dot the exposed raisins with cooking oil (not butter since butter easily burns too) to prevent burning during the baking. Cover with cling wrap and leave for about an hour until it doubles in size. This is the 3rd and final rising. The dough is now ready for baking.
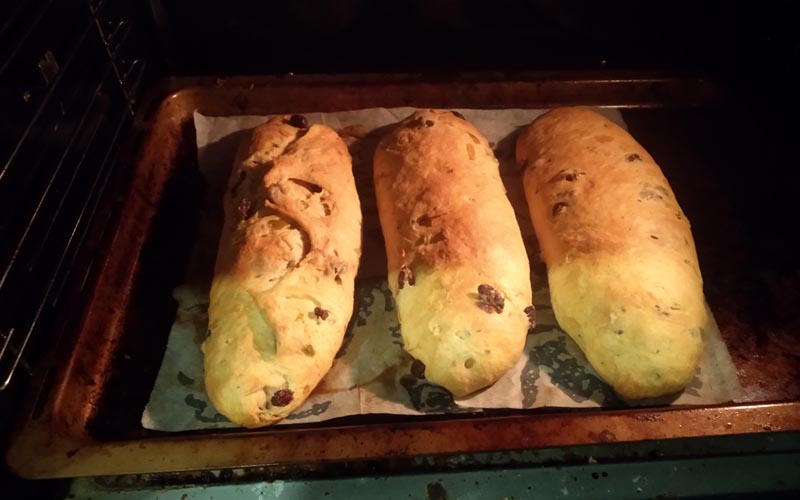
Note: you can also make any number of smaller loaves. Maybe you have a few people you want to gift it to. - Baking - About 10 minutes before the end of the last rise, preheat the oven to 350°F and bake the stollen for 35-45 minutes or until sounding hollow when tapped. Remove from oven and let it cool down for 5 minutes.
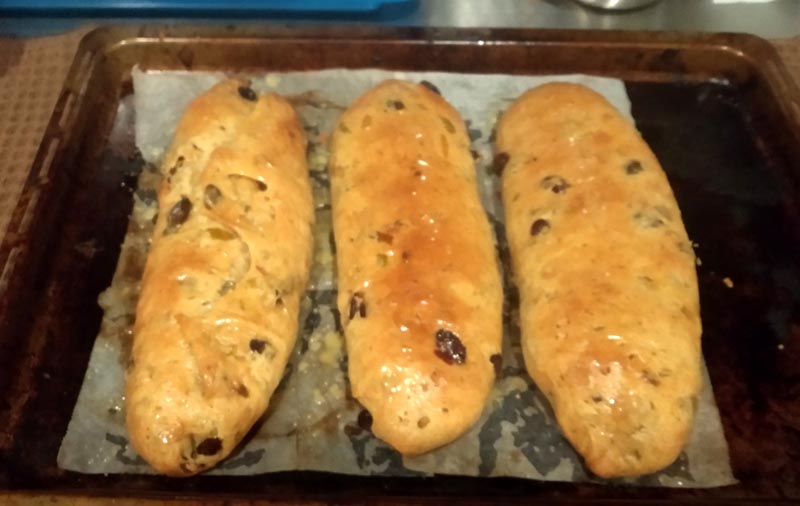
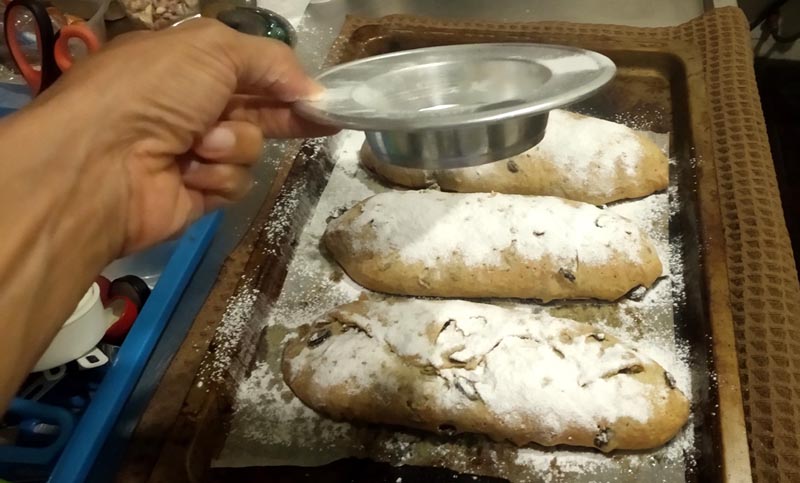
- Glazing - Poke the bread all over with a toothpick until you make about 50 holes/dough. Brush liberally with melted butter. The butter seeps into the holes to make the inside buttery-delicious.
- Dusting - While still wet with the butter, dust the bread generously with sugar using a strainer or sifter. The bread should resemble a snow-covered submarine. Let it cool completely.
- Aging - The Stollen is ready for eating. But for best results, age it to let the rum flavor, citrus peel and spices inundate the entire Stollen. Wrap in plastic bag making sure excess air is removed from the plastic - you can even suck from the end of the plastic bag to create a vacuum. For longer storage, keep frozen.
- Serving - best to serve Stollen (cold, room temp or warm, up to you) in thin slices + piping hot coffee.
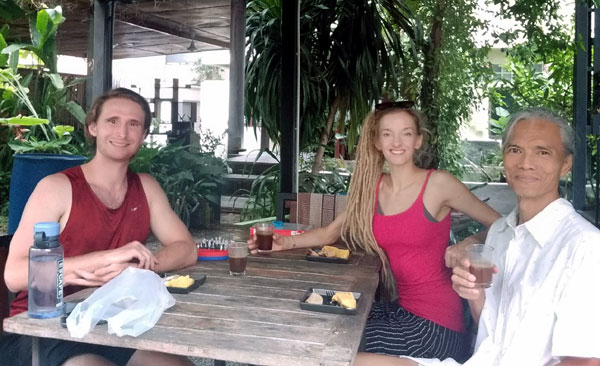
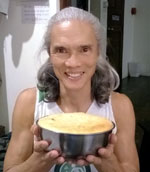
Tom and Simona were the first to have a slice of the Stollen Bread
Ending Thoughts
Whoa!!! This preparation is epic. Usually, when I do a project like this, I offer to sell a small portion to select friends. Not this time. There was too much blood, sweat and tears in doing this for money to change hands. However, these same select friends will get a slice (some thicker than others...LOL) while one guy gets a full loaf (if you don't know who I'm talking about, then it means we're not close). For the most part of the Stollen, it'll remain....my precious!
Thank you Simona for the support. Thank you Colleen for the rose water.
--- Gigit (TheLoneRider)
YOGA by Gigit ![]() |
Learn English
|
Learn English ![]() |
Travel like a Nomad
|
Travel like a Nomad ![]() |
Donation Bank
|
Donation Bank ![]()
Gallery


Preparation Video:
Reader Comments:
 Pamela
 (Sep 16, 2021) ...full flavored/full bodied with good depth and richness and just the perfect amount of sweetness
 Tom
Tom Tom Maher
(Sep 11, 2021) Wow, lots of prep involved indeed! I appreciate being able to taste all of the hard work that went into this bread 🙂
 David
David CRAZY WORLD OF DAVID
(Sep 11, 2021) What can I say? Mind-boggling prep, still very tempting, alas no oven, phew that will save me a stack of work!
(Sep 11, 2021) Yes, the preparation is recipes nested within the main recipe....quite daunting, but modesty aside, it's worth all the effort.
Next Recipe:
![Swedish Cinnamon Rolls [Kanelbullar]](/2021/oct/cinnamon_rolls/thumbnails/cinnamon_rolls.jpg)
Swedish Cinnamon Rolls [Kanelbullar]
(Oct 4, 2021) My first dabble in cinnamon rolls was in New York when someone gave me a Cinnabon - a multi-national chain selling the very popular cinnamon rolls. Like stollen bread, it was epiphany - love at first bite. Somehow, none of the subsequent cinnamon rolls I've tasted compared to Cinnabon. That was my benchmark. Now, since I'd been on a baking roll here at my digs at Nawa Saraan in Chiang Mai where I have a fully functioning bakery at my disposal, I'm rolling up my sleeve to sink my teeth into that Swedish tradition, Kannelbullar, or cinnamon rolls.....more »»Chiang Mai INFORMATION
Chiang Mai Map

Chiang Mai, Thailand
Chiang Mai FYI / Tips
- crop-burning season in Chiang Mai is between late Feb to early April. But laws change everytime. This year, 2019, there is a 61-day ban on burning so the farmers started burning early. When my plane was approaching Chiang Mai on Jan 24, 2019, there was already a thick blanket of smog covering the entire city (and beyond). But within the city itself, you won't feel it (but that doesn't mean the air is healthy). To monitor air conditions in real time, refer to site: Chiang Mai Air Pollution: Real-time Air Quality Index (AQI)
- hot season begins March and lasts until June
- wet season begins July and lasts until September
- best time to visit Chiang Mai is mid-September to mid-February - after the monsoon and before the burning
- you have to try Khao Soi, this is north Thailand's culinary staple
- the tourist area where most of the hotels, restaurants, ticket offices, tour operators are, is located in the Old City
- to exchange your dollars to Thai Baht, the Super Rich Money Exchange give the best rates. There are many branches scattered around Chiang Mai
- get a red cab (songthao) outside the train station for Baht 50 (instead of paying B100 if inside the train station) to Old City - if you haggle nicely enough...I did!
- shared red taxi (songthao) - B30 standard fare plying all over Old City
- for only B50/day, best to rent a bike to go around the Old City - it's a 2.5km2 with lots to discover
- FREE daily yoga classes from 9:00am to 10:15am at Nong Buak Hard Park (southwest corner of Old City). Resident and passing-through teachers take turns conducting yoga classes.
Blues/Jazz Bars in Chiang Mai
- North Gate Jazz Coop - at Chang Phueg Gate, great Tuesday jam session, Blues on Sundays at 11pm by the Chiang Mai Blues band
- Boy Blues Bar - at the Night Bazaar. Mondays at 9:30pm is open mic
- My Secret Cafe - near Wat Phra Singh. Tuesdays at 7:30pm for the changing front-act and 9:00pm for the Panic Band
- Taphae East - 88 Thapae Rd. (just north of Night Bazaar). Fridays at 9:30pm by Chiang Mai Blues Band
Chiang Mai Cost Index
- B60 Chiang beer
- B250 1 hour drop-in yoga session
- B200 one hour Thai body massage at WAYA Massage (highly recommended)
- B50 noodle soup with meat
- B50 coffee
- B40 pad thai
- B30/kilo wash-only laundry
- B50/kilo wash+iron laundry
- B100-150 dorm bed/night
- B250 fan room/night
- B30 internet cafe/hour
- B170-190 Movies Sat-Sun and public holidays
- B130-150 Movies weekdays
- B100 Movies Wednesdays (movie discount day)
- B750 1/2 day Thai cooking lessons
- B900-1000 1 full day Thai cooking lessons
- B400 Muay Thai boxing ticket
- B2500 starting room rate at the luxury hotel, Nawa Sheeva (highly recommended)
- B450 bus, Chiang Mai to Bangkok
- B160-180 bus, Chiang Mai to Pai
- B1250 bus, Chiang Mai to Luang Prabang
- B1650 slow boat, Chiang Mai to Luang Prabang
- B210 bus, Chiang Mai to Chiang Rai, 3-4 hours
- B360 Green VIP bus, Chiang Mai to Mae Sai (Thai border town for visa run to Tachileik, Myanmar)
- B50 bicycle rental, 24 hours
- B200 motorbike rental, 24 hours
- B273 #51 sleeping train from Bangkok to Chiang Mai
- B638 #7 a/c train from Bangkok to Chiang Mai
- B50 red taxi fare from point to point
- B100 red taxi fare from train terminal to city
- B2000 full day elephant sanctuary
- B750 Chiang Rai one-day tour
- B1500 mountain biking scenic ride
Chiang Mai Trains by Train36.com
- Chiang Mai trains for Bangkok - 2 day trains, 3 night trains, daily schedule
- Train 14 to Bangkok - departs 5pm daily, arrives BKK 6:15am, 1st class and 2nd class sleeping accomodation, Special Express
- Chiang Mai trains to other destinations -
Chiang Mai to Bangkok Trains
source: railway.co.th- Check Train Schedule & Fares
- Book Online - direct booking with State Railway of Thailand. Best to register first. If going to BKK from CNX, click "Northern Line".
note -- big difference between booking direct with the State Railway and booking with an online 3rd party agent. 12GO was charging B1330 for the same trip that only cost me B941 with the State Railway.
note -- Oct 2022, I took the #10 Train from CNX to BKK, upper berth, 2nd class, a/c, sleeper, B941. The train was clean, fast, comfortable and modern. If you have heavy luggage that will cost more money in flight checkin, I would suggest this train. Otherwise, the flight now is so much cheaper it doesn't even make sense to take the bus or train.
Bangkok to Chiang Mai by Train from Bang Sue Train Station
For more train info: Bangkok to Chiang Mai trains - departing from Hua Lamphong - MRT (Bangkok)
(I'm using Bang Sue as a starting point because I was closer to it, but you may be closer to the Hua Lamphong station)
- take the MRT train to Bang Sue Station. Take the #1 Exit to the north provincial trains
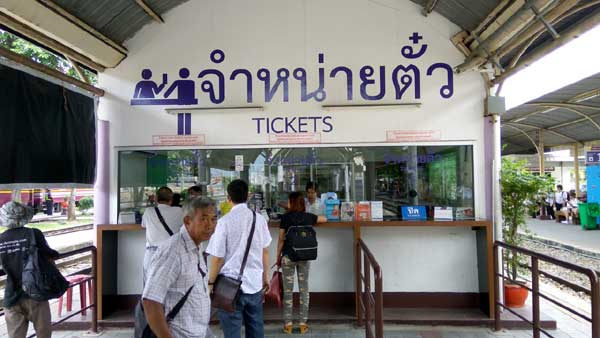
- Proceed to Counter 2. You will see an
information booth, a
train schedule chart and the
ticket counter. Choose the train and pay at the ticket counter.
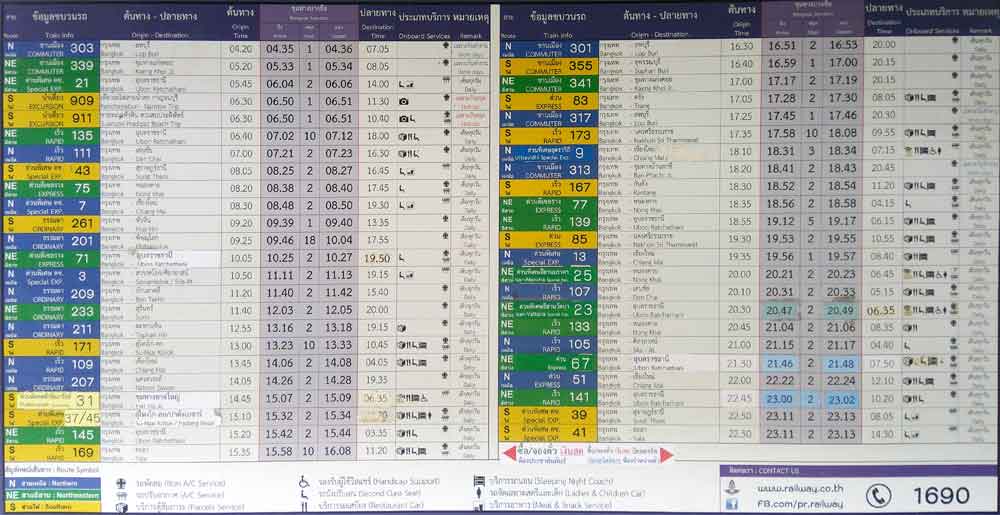
- daily train schedule:
- 8:48am - #7 Train, arrive Chiang Mai 7:30pm, not sleeper, B638
- 2:06pm - #109 Train, arrive Chiang Mai 4:05am, sleeper
- 6:31pm - #9 Premium Train, arrive Chiang Mai 7:15am, sleeper, B938 upper deck, B1038 lower deck
- 7:56pm - #13 Train, arrive Chiang Mai 8:40am, sleeper, B768 upper deck, B838 lower deck
- 10:22pm - #51 Train, arrive Chiang Mai 12:10pm, sleeper, 3rd class B270 (non sleeper), 2nd class B438, B728 upper deck, B798 lower deck
Loei to Chiang Mai by Bus
- From Loei town center, take a tuk-tuk ride to the bus station, B30. There is only one bus station.
- As of June 28, 2020 (still on Covid schedule), there are only 3 night trips: 8:30pm, 9:30pm and 12 midnight. 9 hours, B470.
- The bus makes the following stops at the following times from a 9pm Loei departure: Phu Ruea (9:50pm), Phitsanulok (12:40am), Uttradit (2:20am), Lampang (4:35am)
- Final bus stop is at the Red Bus Arcade, Chiang Mai, 9 hour-trip, arriving 6am (from 9pm Loei departure).
- Take a red songthaew to Old City, B50. They'll try to charge you B100, but they'll take B50 (just assure the driver you won't tell the other passengers).
Chiangmai Blogs by TheLoneRider
- Goodbye Chiang Mai Jan 24, 2019 - Oct 10, 2022
- Chiang Mai Peoplescape Oct 10, 2022
- Siamaya Chocolates Oct 2, 2022 [an error occurred while processing this directive]
- September Snapshots Sep 30, 2022
- Carrot Cake Sep 12, 2022
- Making Coconut Bread Sep 3, 2022
- August Snapshots Aug 31, 2022
- Yoga Nidra with Chunyah and Tom Aug 18, 2022
- Coconut Pancake Aug 11, 2022
- July Snapshots Jul 31, 2022
- Chiang Mai Peoplescape Jul 31, 2022
- Jason, Max and Elizabeth Pizza Nite Jul 28, 2022
- Yakiniku Dinner with Max and Jason Jul 25, 2022
- Icebath at Nawa Saraan Jul 6 - Oct 5, 2022
- June Snapshots Jun 30, 2022
- Tom, Chunyah and Simona Pizza Nite Jun 23, 2022
- Yoga Class Pizza Nite Jun 15, 2022
- Pranayama with Nicha Jun 14, 2022
- May Snapshots May 31, 2022
- Lover's Quarrel May 26, 2022
- Getting Lost on a Hike May 25, 2022
- Biohacker Meetup at 'Living with The Spirit' May 22, 2022
- Music and Magic at Paapu House May 5, 2022
- Breathwork + Icebath @ Alt_Chiangmai II Apr 20, 2022
- April Chronicles 2022 Apr 30, 2022
- Tombstone Epitaph Apr 29, 2022
- Kayaking along the Ping River with the BioHackers Apr 24, 2022 [an error occurred while processing this directive]
- Pizza Nite with Jerry, Paolo and Abby Apr 9, 2022
- Tom Maher's Muay Thai Fight Apr 8, 2022
- Breathwork + Icebath @ Alt_Chiangmai Apr 6, 2022
- Yoga with Leo Apr 5, 2022
- March Chronicles 2022 Mar 31, 2022
- Street Photo Mar 31, 2022
- Peoplescape Mar 31, 2022
- Chiang Mai's Recovering Music Scene Mar 31, 2022
- Street Photo Mar 31, 2022
- Yoga and Fitness Mar 26, 2022
- Friday Bitcoin Meetups Mar 18, 2022
- Pizza Nite with Aida and Sophie Mar 14, 2022
- Pizza Nite with Kevin, Jamie and Kris Mar 10, 2022
- In Search of Genetic Immortality Mar 5, 2022
- February Chronicles 2022 Feb 28, 2022
- Palm-Feeding Wild Birds Feb 26, 2022
- Cuckoo Feb 16, 2022
- Tell John Feb 16, 2022
- Pizza Nite with Kris, Simona and Mary Feb 15, 2022
- Pizza Nite with the Chiang Mai Boyz Feb 6, 2022
- Welcoming the New Year Jan 31, 2022
- January Snapshots Jan 31, 2022
- ABS Fitness Challenge Jan 16 - Apr 16, 2022
- Pumpkin Tahini Recipe Jan 3, 2022
- 2021: A Year in Review Dec 31, 2021
- Pizza Nite with Simona and Lisa Dec 28, 2021
- Tahini Salad Dressing Dec 27, 2021
- Baba Ganoush Recipe Dec 23, 2021
- 7 Universal Laws Dec 20, 2021
- Sacred Circuitry Dec 18, 2021
- Cave-Living in a Boutique Hotel in Chiang Mai Dec 14, 2021
- Tummo Yoga + Wim Hof Breathing + Full-Body Muscle Contraction Dec 13, 2021
- Monk Chat Dec 10, 2021
- Making Tahini and Hummus Dec 8, 2021
- Watering the Plants Hands-Free Dec 2, 2021
- Vietnamese Phin Coffee Filter Dec 2, 2021
- Tummo Yoga Dec 1, 2021
- The Bliss of Inner Fire: Book Summary/Review Dec 1, 2021
- The Bliss of Inner Fire: Heart Practice of the Six Yogas of Naropa Dec 1, 2021
- 'Must Experience' Cafés of Chiang Mai Nov 30, 2021
- British Hobnob Cookies Nov 22, 2021
- New York Cheese Cake Nov 22, 2021
- Dham's Poetry Nov 14, 2021
- Pizza Nite with Simona and Nat Nov 11, 2021
- Stepping Forward / Reaching Out Oct 31, 2021
- Cancel Culture Attack Oct 31, 2021
- Mantra Primer Oct 29, 2021
- Spinal Mobility Oct 7, 2021
- Swedish Cinnamon Rolls [Kanelbullar] Oct 4, 2021
- Just Bring 2 Chinese Oct 3, 2021
- Sep Snapshots Sep 31, 2021
- One-Leg Yoga Asana Sequences Sep 30, 2021
- Pizza Nite with Nut, Monika and Yuki Sep 27, 2021
- 23-Minute Ice Bath Sep 27, 2021
- Pizza Nite with Nut, Simona and Malee Sep 23, 2021
- Yoga Nidra (yogic sleep) Sep 23, 2021
- Making Cornbread Sep 15, 2021
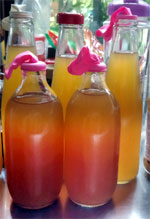
- Kombucha: 2nd Batch Sep 11, 2021
- Making German Stollen Bread Sep 9, 2021
- Pizza Nite with Jackson, Goi and Paapu Sep 6, 2021
- Chiang Mai Peoplescape Aug 31, 2021
- Making Homemade Kombucha Aug 30, 2021
- Wrong Question to Ask This Crowd Aug 29, 2021
- Pizza Nite with Tom, Chunyah and Goi Aug 20, 2021
- Pizza Nite with Moms and Kids Aug 15, 2021
- Bahya Kumbhaka (breath-hold on the exhale) Aug 14, 2021
- Everybody's Only Friend Aug 13, 2021
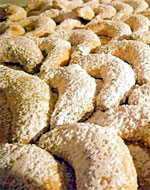
- Vanillekipferl (German Vanilla Crescent Cookies) Aug 11, 2021
- Fighting Infection through Yoga Aug 3, 2021
- Too Close for Friendship Aug 2, 2021
- Manifesting: Epicurus' Pursuit Jul 31, 2021
- Homemade Rum Raisin Ice Cream Jul 30, 2021
- Ice Bath at Nawa Saraan Healing Space Jul 25, 2021
- Pizza Nite + Slack Line + Hammock Jul 23, 2021
- Yin-Yoga & Hypnosis with Christine Thiel Jul 20, 2021
- Pizza Nite with James and Nat Jul 19, 2021
- Antara Kumbhaka on Nadi Shodan Pranayama: Yogic Breath-Hold on the Inhale Jul 17, 2021
- Moving and Cashing-Out Bitcoin Jun 2 - Jul 11, 2021
- 'The Bow' Yoga Jul 7, 2021
- Yoga Classes with Calum Mar 27 - Jul 4, 2021
- Hike to Wat Pa Thammachat Waterfall Jul 2, 2021
- Pizza Brunch with the Yogis July 1, 2021
- Continuing Friendships in Chiang Mai Jun 30, 2021
- On the Brink of Hunger, the ENABLERS Come to Light Jun 21, 2021
- Hatha Vinyasa Yoga with Katharine Day Jun 17, 2021
- Pranayama Basics II Jun 16, 2021
- 36-Hour Love Life Jun 11, 2021
- Pranayama Basics I Jun 9, 2021
- Biohackers Meetup in Chiang Mai Jun 6, 2021
- Learning How to Breathe Jun 2, 2021
- Not the Usual Day-to-Day Life May 31, 2021
- Morphing Peoplescape of Chiang Mai May 31, 2021
- Breathwork & Ice Bath with Jason Ryer of Zen Strength May 23, 2021
- It's Raining Bell Peppers May 7, 2021
- Yoga Classes with Nana Apr 20, 2021
- You Want to be Wonder Woman? Apr 8, 2021
- Kunjal Kriya / Vamana Dhauti (induced vomiting) Apr 1, 2021
- Coffeemates, Breadmates and Yogamates in Chiang Mai Jan-Mar 2021
- Varisara Dhauti (cleansing of the entire digestive tract) Mar 26, 2021
- Spiritual Backpacker Interview by Napasorn 'Cherry' Suvarnapradip Mar 23, 2021
- Private One-on-One Yoga Classes with Doriana Feb 17 - Mar 14, 2021
- Transformational Life Events Mar 13, 2021
- Guess Who's Coming to Bread Day? Mar 1, 2021
- Mula Shodhana (anal cleansing) Feb 27, 2021
- Are You My Queen? Feb 25, 2021
- Breaking the 5-Minute Breath-hold Barrier Feb 25, 2021
- Kirtan with Chiang Mai's Khun Thai Seekers Feb 7, 2021
- Breaking the 4-minute Breath-hold Feb 7, 2021
- Pranayama Primer Feb 2, 2021
- Heartbreak in every Song Jan 24, 2021
- The Silent Killer is Baaack! Jan 12, 2021
- Learning the Thai Language Jan 9, 2021
- 2020: A Year in Review Dec 31, 2020
- Reversing/Slowing Down the Aging Process Dec 30, 2020
- Hike to Huay Keaw Waterfall Dec 20, 2020
- Yoga Mat Dec 19, 2020
- Hiking to Wat Pha Lat along the Monk's Trail Dec 19, 2020
- Am I Psycho? Dec 9, 2020
- Muffin Man Dec 8, 2020
- Polyamory Dec 4, 2020
- The Wim Hof Ice Bath Dec 3, 2020
- RSVP Nov 25, 2020
- High Intensity Interval Yoga (Yoga + HIIT) Nov 14, 2020
- Cleansing the Nadis (Energy Pathway) Nov 13, 2020
- Yoga for a 360-degree Core Nov 6, 2020
- Edward Witten: 'the smartest living physicist' Nov 4, 2020
- Srinivasa Ramanujan: Mathematician of the Divine Oct 27, 2020
- Bashar as Channeled by Darryl Anka Oct 26, 2020
- Vinyasa Krama and Ashtanga Yoga with Aida Yoga Oct 18, 2020
- Deepak Chopra: author, lecturer, healer Oct 12, 2020
- Facebook Friends Oct 1, 2020
- Chiang Mai Peoplescape Aug-Sep 2020 Sep 30, 2020
- Siddhis (yogic super powers) Sep 30, 2020
- Learning the Import/Export Trade Sep 4, 2020
- Music and Magic at Justin's Birthday Bash Sep 3, 2020
- Biggest Stone in his Shoe Sep 1, 2020
- Abandoned Aug 25, 2020
- Intelligent Romantic Break-up Aug 25, 2020
- Dad-Zoned Aug 18, 2020
- Public Display of Affection Aug 9, 2020
- Gabriella's Birthday Bash at Mothership Resort Aug 8-9, 2020
- Shifting Peoplescape of Chiang Mai July 31, 2020
- Yoga Class for Strength and Muscle Jul 30, 2020
- Yoga Class for Optimum Digestion July 29, 2020
- Yoga Class for Healthy Eyes Jul 27, 2020
- Hippie Night at Nawa Saraan Healing Space July 24, 2020
- The Podcast Series: Alan "Heart Math" Strydom Jul 17, 2020
- Prana Vayu Adhitthana Yoga Class July 11-12, 2020
- Coming Back to Chiang Mai Jun 29, 2020
- Goodbye Chiang Mai Jan 23, 2020
- Prasnopanishad: Understanding Prana Jan 17, 2020
- Hiking the Monk's Trail Jan 15, 2020
- Chaturanga Jan 10, 2020
- You Spooned Me Jan 3, 2020
- 2019: A Year in Review Dec 31, 2019
- Friends, Coffeemates and Breadmates (Dec 2019) Dec 31, 2019
- Visiting Mae Sot Dec 27-30, 2019
- Let's Make it About You - an Epiphany Dec 17, 2019
- Shut-Up! Dec 7, 2019
- Roasted Red Bell Pepper Puree Dec 3, 2019
- Coffeemates and Breadmates (Nov 2019) Nov 30, 2019
- Bhujangini Mudra Nov 25, 2019
- Mathangini Mudra Nov 24, 2019
- Kaka Mudra Nov 23, 2019
- Pasini Mudra Nov 20, 2019
- Aswini Mudra Nov 18, 2019
- Sambhavi Mudra Nov 16, 2019
- Manduka Mudra Nov 15, 2019
- Tataka Mudra Nov 14, 2019
- Sakti Calana Mudra Nov 10, 2019
- Vajroli Mudra Nov 9, 2019
- Coffeemates and Breadmates (Oct 2019) Oct to Nov 5, 2019
- Yoni Mudra Nov 1, 2019
- Viparita Karani Mudra Oct 31, 2019
- Khecari Mudra Oct 30, 2019
- Mahadeva Mudra Oct 28, 2019
- Sacred Cacao - Chakra Dance Journey Oct 26, 2019
- Partner Healing with Natascha Oct 24, 2019
- Maha Bandha Mudra Oct 24, 2019
- Point-Of-Failure Birthday Workout Oct 22, 2019
- Mula Bandha Mudra Oct 21, 2019
- Hugfest at Thapae Gate, Chiang Mai Oct 19, 2019
- Anushasan Mudra Oct 18, 2019
- Ling Mudra Oct 17, 2019
- Jalandhara Bandha Mudra Oct 15, 2019
- Learning Thai with Cee Oct 13, 2019
- Uddiyana Bandha Mudra Oct 10, 2019
- Nabho Mudra Oct 9, 2019
- Maha Mudra Oct 7, 2019
- 20 Essential Mudras by T. Krishnamacharya Oct. 6, 2019
- Mindfulness Gong Bath by Vee (Veerayuth Pongsiri) Oct 3, 2019
- Cuddle Party by Abundant Love CM Oct 1, 2019
- Vayu Mudra Oct 1, 2019
- Visa-Run to Tachileik, Myanmar Sep 28, 2019
- Sankalpa Mudra Sep 27, 2019
- Surya Pradarshini Mudra Sep 26, 2019
- Eye-Gazing at Heart Space Sep 20, 2019
- Prana Vayu (Pranic Wind) Sep 20, 2019
- 2-Week Yoga Challenge by Agnese Erba Sep 17, 2019
- The Mudra Project Sep 13, 2019
- Sunday Vinyasa Flow with Marina Forster Sep 8, 2019
- Shamanic Breathwork by Rachel Constantino Sep 4, 2019
- The Conscious Peoplescape of Chiang Mai Aug 31, 2019
- Of Winos and Yogis Aug 26, 2019
- The 9 Jhanas of Buddha Aug 22, 2019
- Wicked Game: Anger and Pain August 19, 2019
- Full Moon Ceremony at Heart Space Aug 15, 2019
- Yin Yoga - Water Element by Martina Barabas Aug 15, 2019
- Hatha Mix Yoga with Christin Aug 13, 2019
- Boy Blues Bar Rocks Chiang Mai Aug 5, 2019
- Back to my Beloved Chiang Mai Aug 1, 2019
- Kaleidoscope of Chiang Mai's Peoplescape July 27, 2019
- Secret Sunrise: Nelson Mandela International Day July 17, 2019
- Farewell Picnic with Alan and Nicola July 15, 2019
- Secret Sunrise: Water July 3, 2019
- Hotel Review: Arun Suite June 27, 2019
- Bruce Lipton: Epigentics to Transcend Genes June 24, 2019
- Optimizing Life thru Heart Math May 8, 15 and 22, 2019
- Connective Cacao and Sound Journey June 12, 2019
- Chiangmai BLUES June 6, 2019
- Hatha Slow Flow with Neil Jefferson June 3, 2019
- Meditating with One Million Meditators Movement June 1, 2019
- Vinyasa Happy Flow Series by Vaida May 31, 2019
- Muay Thai at the Chiang Mai Boxing Stadium May 30, 2019
- Yoga Flow Through the 7 Chakras by Sabrina Pilz May 30, 2019
- The Outsiders (people you need to push out of your sacred circle) May 31, 2019
- Fascinating Peoplescape of Chiang Mai May 22, 2019
- World Meditation Day at Heart Space May 21, 2019
- Abs Yoga by Gigit May 12, 2019
- Kundalini and Vinyasa Yoga with Nicola Symons May 10, 2019
- Secret Sunrise Interactive Dance May 9, 2019
- Tok Sen Massage from Ying May 8, 2019
- Bruschetta: Nawa Saraan Style Apr 22, 2019
- Thai Cooking at Pra Nang Thai Cookery School Apr 20, 2019
- Bonding with the Elephants in Chiang Mai Apr 11, 2019
- Ziplining in Chiang Mai with Eagle Track Zipline Apr 10, 2019
- Getting Thai Massage from Chiang Mai's Best (Lar Thanakrit Khamtanong) Mar 21, 2019
- Being the Soul of Nawa Saraan Hotel Mar 18, 2019
- Peoplescape of Chiang Mai Jan 24 - Mar 13, 2019
- Curing Cancer with Yoga? Feb 21, 2019
- International Training Massage School (ITM): Level 1 Feb 11-15, 2019
- Sandesch Album Launch by Christoph Joerg Feb 13, 2019
- Meditation in a Sensory Deprivation Tank at Float Chiang Mai Jan 29, 2019
- Reiki Share at the Mastermind Brain Spa Jan 26, 2019
- Resuming Life in Chiang Mai Jan 24, 2019
- 4 Days in Chiang Mai at Nawa Saraan Hotel Jan 2-6, 2019
- Mike Chong Aug 8, 2018
- An Intimate Conversation with my Universe in Chiang Mai Aug 8, 2018
- Kneaded and Pampered at Zira Spa Aug 4, 2018
- Savoring a Baht 3,500 Birds Nest Soup at Natural Bird Nest by Burapa Aug 3, 2018
- Yoga Exploration at The Yoga Tree with Gernot Aug 1, 2018
- Laughter Yoga with Saffiya Arnous July 31, 2018
- Yoga with Adam at Hidden House Yoga, Chiang Mai July 29, 2018
- 2 Weeks in Chiang Mai July 25 - Aug 7, 2018
- A First Timer in Chiang Mai Apr 9-23, 2016
- Chiang Mai's Amazing Peoplescape Apr 9-23, 2016
- Dance Mandala in Chiang Mai at The Yoga Tree Apr 19, 2016
- Songkran Waterfight Festival in Chiang Mai Apr 13-15, 2016
- Border Crossing from Siem Reap (Cambodia) to Bangkok (Thailand) to Chiang Mai April 9-10, 2016
Travel Tips for Thailand
How to Get a 60-Day Thai Tourist Visa and then Extend by another 30 Days
This process is BEFORE Covid 19. Not sure what it is now.
- Bring the following to the Thai embassy:
a) proof of money (bank statement will suffice)
b) flight booking to Thailand
c) onward flight back to your country from Thailand
d) filled-in tourist visa form
e) 2 passport pictures
f) hotel booking in Thailand (they didn't ask me for this but better be safe)
g) passport with at least 6 months validity - After handing over all the documents, they will ask you to come pick your passport with the visa the following day from 4 to 5pm. That's it!
- NOTE: after 2 successful attempts, I was already questioned the 3rd time.
60-Day Thai Tourist Visa
NOTE: There is no need to go back to your country to get the Thai tourist visa. Any major city with a Thai Embassy will do. Apparently there is also no need to have an invitation from a Thai establishment to justify the visa.
- bring the following to the Immigration Office:
a) passport (make sure your Tourist Visa hasn't expired yet)
b) Baht 1900
c) photocopy of your passport + visa duration date stamp + TM6 card (white immigration card) and sign all the copies
d) completed TM7 visa extension form (available at the Immigration Office)
e) one 4cmx6cm passport picture - submit the above to the Front Desk. They will give you a stub with your number on it. Take a seat and wait for your number to be called
- when your number is called, your picture will be taken. Then go back to your seat. They will call you again.
- when they call you again, they'll give you your passport with your extended visa. That's it!
- when there are no lines, the whole process can take only 10 minutes
30-Day Extension
NOTE: When your 60-day visa is close to expiry and you want to extend your stay. No need to leave Thailand.
Book Train Tickets in Thailand
Book Train Tickets in Thailand Online by Train36.com
General Travel Tips
- arrive early - in case there is a snag (visa snag, documentation snag, transport ticket snag, etc.), you will have ample time to troubleshoot the problem if you arrive early (to the airport, to the bus terminal, etc.)
- put detailed itinerary on the Calendar apps of your smart-phone according to timelines - this is where you do all your thinking and planning. Once written down, you don't have to think anymore while you are on the journey...you just follow the steps. This frees your mind for something else that might happen while you are already en route
- avoiding scams - as a general rule, I ignore the touts or anyone I don't know who call out to me. The calling comes in many forms - "Hi! Where are you from?", "Excuse me! Excuse me!", "Where are you going?". I don't look them in the eye and I remain non-verbal with them. If you reply to them, you just gave them an 'in' to hound you. In order not to look rude, I smile and wave the 'not interested' hand to them, without looking at them.
- power bank - hand-carry your power bank. Do not check it in. You can be called in when you are already inside the plane to go all the way to the loading dock so you can personally remove the power bank...and chances are, you'll have to surrender it to them. And you might delay the plane departure!
Currency Converter
»» back to Recipes
»» back to Homepage
ARCHIVE 2025:
JAN |
FEB |
MAR
1970 |
1973 |
1975 |
1976 |
1977 |
1979 |
1981 |
1996 |
2000 |
2001 |
2002 |
2003 |
2004 |
2005 |
2006 |
2007 |
2008 |
2009 |
2010 |
2011 |
2012 |
2013 |
2014 |
2015 |
2016 |
2017 |
2018 |
2019 |
2020 |
2021 |
2022 |
2023 |
2024 |
2025 |
ALL BLOGS
